Tuesday, March 19, 2013

Your Car 101 (Series) - Changing a Tire

I'm sure we've all been caught in a situation where we've unexpectantly had a flat tire.  It can be a scary scenario, but if you're one of the many that do not have roadside assistance, it might be time to get dirty.  Changing a flat tire is different when we are talking about a car or a truck, so consider this article as more of a general guide.

Some vehicles are equipped with full size spares.  What that means is that the spare is the exact same size (height and width) as the other four on the vehicle.  Others are equipped with a spare in which are significantly smaller than what's on the vehicle.  Keep in mind that these types of spares are ONLY to be used to get from where you are to your final destination.  Most are not recommended to be driven more than 100 miles and are not to be considered a replacement or to carry you through a long trip.

If there's one thing I remember from my childhood, it's the Boy Scout Motto: "Be Prepared".  Make sure you have the proper tools to change your tire.

[  ] Spare tire.  Surprisingly more cars these days are not coming with a spare tire but with a tire inflator.  If you fall in this bracket, visit your local tire shop where you could purchase a wheel and tire combo as your spare.  They can make sure you have a wheel with the proper offset and bolt pattern that fits your vehicle.  (I'll define these in another article.)  Chances are that a full size spare will not fit in your vehicle without taking additional trunk space.  If you're not comfortable with that, find a tire option that will fit and still serve its purpose.  A tire inflator will not help if your flat is due to a puncture in the tire.

[  ] Jack and Lug nut wrench.  Most cars do come equipped with this.  However, if you've bought your vehicle used, these items are sometimes missing.  You can purchase any of these at your local auto parts store.  If this is included in your car, check your owner's manual for where the car manufacturer put it.  Possible locations for a car include under the mat in the trunk, in a side pocket of the trunk.  Possible locations for a truck include under or behind the rear seats.

[  ] Owner's manual.  If you bought your vehicle used, you might find this missing also.  No worries.  The car manufacturer's dealership can sell you a replacement.  Or, these can usually be bought on eBay or various places for a pretty cheap price.

[  ] Flashlight.  You never know when a good flashlight will come in handy.  Be sure to check the batteries regularly!

[  ] Gloves.  If you're someone who is normally dressed for an office environment, you may not be properly dressed for a nasty tire change.  Gloves won't keep your clothes clean, but they'll help you from transferring any dirt from your hands to your clothes when you get back behind the wheel.

Now that you have all the proper equipment, let's give it a shot.  Go ahead and practice at least once.  They say practice makes perfect.  So what do you do?

1) Pull off to the right shoulder of the road.  Turn on your hazards. Safety first!  This lets the other drivers know there's a car on the side of the road.  If the flat tire is on the driver's side, move as far right as possible.

2) Get out your spare tire and tools.  Do this from the passenger side (away from moving traffic) if you can.  Get those gloves on.

3) Use your lug nut wrench and break the lug nuts loose.  Here's where my other blog: Beware of the impact wrench can be helpful.

By using the tire's friction against the ground, it'll help you to break loose the lug nuts.  The lug nuts should be on pretty tight. What a sight it would be to see your wheel to pass by while you're driving!  However, they should not have been tightened so much that you cannot undo the lug nuts even by jumping on the wrench.

Points where to jack up your car.
Car Jacking Points
4) Once all the lug nuts have been loosened up, jack up the vehicle.  Cars and trucks have different jacking points, so seek your owner's manual to where your proper locations are.  If it's a car, you'll find the jacking point just under the doors of the vehicle. There will be a sheet of metal under the car called the pinch weld.  You will find either two notches cut out on the ends closest to the tires or a cutout.  (See image.)  The jack should touch between the notches or where the cutout is.

If you have a truck, you will be jacking up near the suspension of the vehicle.  Sometimes it's a plate just under the shock.

5) Remove the lug nuts the remainder of the way off the wheel studs.  Remove the wheel with the flat tire.  Now, keep in mind, your tire is flat, and you have just jacked the car high enough to remove it.  Here you'll have to test fit the spare tire and jack the car up as necessary to place the spare on.

6) Once your spare is on, start threading the lug nuts back on the car.  When you do this spin your tire (if it'll spin).  This will help you center the spare.  If not, wiggle the spare as you tighten down the lug nuts.  At this point the lug nuts should on be "hand tight".  No tools are to be used.
How to properly put on your spare tire.
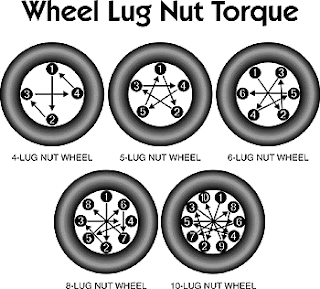
Wheel tightening pattern.
7) Get your lug nut wrench and tighten the lug nuts snug.  See the image for the pattern you should follow.  You do this because it helps make sure that as you're tightening more, the wheel is truly centered.  If it's off centered, the spare won't rotate in a circle, and it could ruin the wheel studs.

8) Check to make sure nothing is left under the car and slowly let the jack down.

9) Yay!  Your car is back on the ground.  While on the ground, re-tighten the lug nuts with your lug nut wrench just to make sure they're on nice and tight.

10)  Pack it up!

If you do not have a full size spare, drive slowly.  You don't want to drive too terribly fast and some of the spare tires will have the max speed written on the side of the tire.  This is for your safety  so please follow these.

A flat tire situation is never exciting.  However, being prepared for it can make it less painless.  Be safe!

Bryan Lin | CEO, The Motorsports Authority, Inc. | MSAStore.com

Tuesday, February 26, 2013

Dyed, Metalized, Hybrid and Ceramic Window Film. What's Best?

Each of the four types of film is named because of the primary component used to protect you and your car.  With so many options, which do you choose?

There are a lot of benefits to using window tinting; glare reduction, heat protection, fade protection, U.V. protection, safety, aesthetics, privacy.  You will have to decide, what you are wanting your window tint to do.  Window tinting is simply adding a layer of UV treated optical grade polyester film.  That film can be manufactured in several ways, not just in the components mentioned in this article, but more specifically how it is made.

Dyed Film
This type of window tinting relies on the absorbing properties of the dye to keep your car cool.  Because it does not contain any metal it gives your automobile the blackest look and does not have any "sheen" to it.  This film rejects the least amount of heat and is mainly used for its appearance.  It does reduce glare, and reduces fading to interior upholstery.

Metalized Film
This film is a good product for customers that desire crisp appearance, heat reduction, glare reduction, fade protection, and UV protection.  Metalized window film are either all metal or have a single layer of ceramics.  Metalized window tinting is very good at reducing heat and reflecting UV rays.  However, they are very shiny and can cause interference with radio, GPS, TPMS (Tire Pressure Monitoring System) sensors, and cell phones.  Its shade and color are mainly determined by the type of metal used to make it.  Metalized window film's purpose is to reflect.  These are rarely used anymore after the introduction of the TPMS.

Hybrid Film
Hybrid films use a combination of a dyed layer as well as a metalized layer.  Using Hybrid window tint offers the best of both worlds. A metal layer is used for its reflective qualities and a dyed layer is used for its absorptive qualities.  Because not a lot of metal is used by some manufacturers, these are the best bang for the buck as they don't block any of the signals the 100% metalized films do.

Ceramic Film
The fourth and final type of window tinting is ceramic.  Absorbing twice as much heat as dyed or hybrid films, it is considered to be the most technologically advanced type of window tinting.  It is capable of high heat absorption at relatively light shades.  It is definitely the ultimate in heat reduction; however, the cost is almost twice that of Hybrid films.  This film is optimal for customers desiring a highly durable material, with excellent clarity, and providing superior heat reduction versus other film choices.

It's easy to think that all lifetime warranty films are alike.  Many get caught up in the trap of comparing pricing rather than the film quality.  Be careful.  Some companies may install the dyed film rather than the hybrid, selling it at a lower price but actually making a higher profit.  Also, note thicker film may take up to weeks longer to dry out than other film choices.  Ultimately, it comes down to the purpose for getting your windows tinted.

- Bryan Lin | CEO, The Motorsports Authority, Inc. | MSAStore.com

Monday, February 4, 2013

Your Car 101 (Series) - Checking Tire Pressure

A: Checking the tire pressure isn't a very difficult task.  However, It is important to check in on a regular basis.

Air is comprised of my particles.  Air expands and contracts with temperatures - expands with heat, condenses with cold.  So you will find many times that when fall/winter comes, your tire pressure decreases, and just as spring/summer hits, your tire pressure increases.

Accurate tire pressures can affect several things.  Improper maintenance of your tire pressure can decrease your tire's life.  Too little air pressure causes more tire to contact the pavement but also puts the tire in a pinch between the surface and the wheel.  This creates almost a rubbing effect where each bump pinches the tire and wears away at the inside surface.  Eventually...this could cause the tire to pop while driving.  However you look at it, if your tire's air pressure is low, you're decreasing the life of your tire.

Two, improper maintenance of tire pressure can affect the car's gas mileage.  Crazy, huh?  Well, think of it this way.  Too little air pressure creates excess rubber to contact the road, creating a larger area of friction or resistance.  The car has to work harder on each rotation to push/pull (depending on how you imagine it) the car.  Have you ever tried pushing a wheel barrel with a low tire?  Your car feels the same way.  According to FuelEconomy.Gov, "under inflated tires can lower gas mileage by 0.3 percent for every 1 psi drop in pressure of all four tires."  That's huge considering you could gain almost 4% better fuel economy by just maintaining your tire pressure.

If you're unsure where your tire pressure should be, don't fret.  Car manufacturer's tell you!  Open the driver's door and look at the door jam.  Somewhere close to the door latch on either the body of the car or the door, you will find a sticker with tire sizes and the recommended tire pressures.  Sometimes, they will also tell you recommended pressures during hot and cold weather seasons.  If it's not in your door jam, other locations include the glove box, trunk, center console, or the owner's manual (if you have one).

Don't know how to check it?  Well...there's no reason for me to reinvent the wheel.  The DMV offers a very good instructional page, including what I was going to recommend - do NOT buy the cheapo tire pressure gauges.  DMV Webpage.

Bryan Lin | CEO, The Motorsports Authority, Inc. | MSAStore.com

Wednesday, January 23, 2013

Car Alarms and Remote Starts - What's the Best? Where Should I go?


There is a sea of aftermarket Alarms and Remote Start systems available out there.  Auto parts stores, Electronics Retailers (i.e. Best Buy), and Vehicle Audio/Video Retailers all carry specific brands and varieties.  So what is the best out there?  How do you choose the best system that fits your needs?

Plain and simple - shop around.  However, the cheapest is definitely not the best.  You get what you pay for.  Let's discuss alarms first.

A cheapo $30 alarm isn't going to cut it.  You may find it at a parts store.  It may even carry a familiar brand name.  We get a huge influx of people wanting these installed immediately after the Christmas season.  However, you may find them disappointing.

1) The antenna's reception is significantly shorter.  We installed such an alarm for a client.  After installation, we found that she had to be approximately 8-10 feet from her vehicle in order to arm, disarm, or remote start her vehicle.  Imagine her excitement.

2) Although electronics costs have and is rapidly dropping, capacitors, resistors, and circuit boards all play a role in the alarm module.  Cheaper materials means early failure rates.

Variety of Alarms. These days, each brand carries a variety of options.  Since I am familiar with the brand we carry, I am using it as my example.

1) Keyless Entry / Alarm. - This is the alarm system that comes to mind when you say "car alarm".

2) Keyless Entry / Alarm 2 way system - This is the next step upgrade.  The easiest way to define this is to break it down to it's literal term.  The signal can be sent 2 ways.  Basically your alarm box receives signals from your remote, and your remote receives signals from your alarm.  Basically, any alerts will signal the remote.

3) Keyless Entry / Alarm - 2 way system - 1 mile system.  This system is the same as the last with an extended range.  The easiest analogy would be this system would reach your car if you were at the back of Walmart.  The previous models would reach your car if you were at the cashier's or at the doors.

Remote Starts

These are a little more difficult to decipher, but the same rule applies: Cheaper is not Better.  Internals and components all follow the same rules.

So which system is best?  The alarm varies mentioned above also follow the same varieties, just add "remote start" to the listing.  However, most vehicles since 2005 have an electronic vehicle theft deterrent system of some type.  A bypass module is required for these systems to work.  Basically, the bypass module retains your factory theft deterrent system, but when the remote start is activated, the bypass module mimics the coding on your keys allowing the vehicle to start.  There are two main companies that make these modules for every brand available, and they are either sold under their own name or re-branded.

If you're considering a remote start, they are great to have.  Most people think of them in the winter time for thawing vehicles from under a sheet of ice or snow.  And the summer?  Well, when you're vehicle is scorching hot, it's definitely a feature of comfort to cool your interior down before you get back in.

There are many reputable brands on today's market.  It's important to use the brands familiar to the company you choose to install your system.  Different alarms have different color coded wires and connectors.  Bringing an unfamiliar brand to a company usually takes more time.  You may find that if a company is willing to accept the installation of the alarm you bring, the billed labor hours will match or exceed that of purchasing the company's brand.

- Bryan Lin | CEO, The Motorsports Authority, Inc. | www.MSAStore.com

Wednesday, December 19, 2012

Your Car 101 (Series) - What to look for when buying a Used Car

Buying a Used Car?  8 tips to make sure it's not a money pit.
These days, it can sometimes be scary buying a used car.  You've worked hard and saved your money, but the lemon law doesn't apply to that used car you're looking at.  So how do you know that car will be a reliable, sound car that will keep you from dumping more into it?  Here are 8 tips to help you decided if you should move on to the next car.

1) Check the paint.  Being a used car, it might have a few bumps, chips, and scratches, but look closer...  If there are scratches in the color of the paint instead of the exterior clear coat of the vehicle, it has been repainted.  The paint could have been unsightly and the previous/current owner chose to repaint it.  OR the vehicle could have been in an accident at some point.  Keep in mind, CarFax only shows accidents that have been reported.  So if there was an accident where a claim wasn't filed or the DMV didn't know about it, you won't find it.

Another indication if the vehicle has been repainted is what's called "trash".  When clear coating a vehicle, body shops can't guarantee a 100% dust free environment.  Trash are specs that are embedded into the paint.  You can easily tell these by lightly swiping your finger or hand across it.

2) Check for oil.  Cars are typically well detailed before selling.  Usually, there's a nice coat of shine on the plastics in the engine bay.  However, if you look closer, you will still find signs of past or current oil leaks.

Look under the engine.  Most people aren't going to spend the time to pressure wash and thoroughly clean the underside of a vehicle.  If there is an oil issue (engine, steering, etc...), you should be able to notice it underneath.  It will look like blob of caked on black soot.  A giveaway is if you see a black, textured clump in certain areas and not others (typically on the section facing the front of the vehicle and not on rear), then it is from a past/current oil leak.

Bring a rag and pull the dipstick.  Check the oil like your normally would (pull, wipe off, reinsert, and pull again.)  Not only should the oil be present between the two indicator marks, the oil should not be clumpy.

3) Check the coolant.  You can view the coolant in the coolant reservoir or the radiator.  (DO NOT remove the radiator cap unless the engine is cool.  Very slowly and cautiously is a good rule of thumb.)  The coolant should be a light green or red.  It should NEVER be brown.  Brown coolant can be evidence of a rusty radiator or rust inside the motor.

4) Check bushings (this mainly applies to vehicles over 3 years old).  Bushings are the rubber components
at two adjoining metal parts.  Their purpose is to absorb vibrations of the engine and the road.  They take quite a beating depending on the driver.  Turn the wheel to the right, exposing the back side of the wheel.  Glance behind the wheel to see if any of the rubber components are worn, show grease, or ripped apart.  Turn the wheel to the left and repeat.

Also check the motor mounts.  These are the rubber components that not only absorb the vibrations from the engine, but attach it to the car.  You should find at least three.  Here you're looking for the rubber to have completely separated from its metal housing.  The heat of the engine will cause rubber to dry and crack.  This is natural.  But if the rubber has completely separated, that can be a cause for a chain reaction of repairs.

5) Check gaskets.  This can be hard sometimes with other engine components in the way.  Most vehicles have a separate gasket that prevents oil from getting into the spark plugs.  Easiest way to check this is pull the spark plug wire.  If there's oil on the end of the wire, the spark plug gasket needs to be replaced.

Head gaskets can't be checked visually.  However, valve cover gaskets can.  Some engines have a plastic cover.  If possible, go ahead and remove it.  The metal on the top of the motor is usually called the valve cover.  (There are exceptions to this rule, and it's difficult to explain without going in depth on the other components.)  If the valve cover gasket needs to be replaced, you will either notice oil or clumps of black soot but only on the motor below the valve cover.  Most of the time a simple fix but go ahead and inquire about it while you're there.

6) Go over the electronics.  We automatically assume everything works, but sometimes that's not always the case.  Turn on the headlights, wipers (don't forget the rear if equipped), turn signals, flashers (go ahead and check this since it's on a different switch), interior lights, radio - change channels, etc..., defrost (if you can), air, a/c, and heater.  If the vehicle is equipped, check the power seats, steering wheel adjustment, mirrors, windows (all of them), and 4WD.

7) Go over the tires.  They should have a solid consistent appearance.  Old, worn, or rotting tires will show cracks in the side of the rubber.  If you decide to purchase the vehicle, keep in mind that tires showing this will have to be replaced soon.  Better safe than to have a blow out while driving.

8) Of course, drive it!  Yes, I know that you're going to test drive the vehicle.  However, here's a few things you might not have thought to pay attention to.

While at idle (car isn't moving but in drive), watch the engine's temperature.  If you find it rising, it has some cooling issues which could mean replacing the thermostat, replacing the radiator, or there is air in the coolant system.  Left alone, this will completely destroy a motor.

Does the car drive straight without any force?  If the car is wanting to drift to the right or left, it may need an alignment or there has been some significant suspension damage.

Of course, these aren't to be substituted for letting your trusted mechanic look over the vehicle before purchasing.  But I hope it helps you to purchase a great vehicle versus a money pit.

- Bryan Lin | CEO, The Motorsports Authority, Inc. | MSAStore.com

Tuesday, December 4, 2012

Your Car 101 (Series) - How do I know my alternator is bad?

Problems Starting?
That is a very easy DIY (Do It Yourself) check.  First, let's understand the basics of the alternator, and it's relationship with your car and your battery.

The Battery

Your battery is what starts your car.  It stores enough "energy" to get your motor moving.  That is why the CCA (Cold Cranking Amps) is important when choosing a replacement battery.  The battery also provides a backup for your car when the car sees a larger draw on it's electrical system than what the alternator can handle.  This can be seen with people that have a large subwoofer/amplifier system.  You can see their headlights or interior lights dim each time the bass hits, or when the amplifier puts a huge draw on the electrical system.

The Alternator

The alternator keeps the car running and recharges your battery after the car starts.

Checking the Alternator

SO, the quickest and easiest way to check your alternator is to

       1) Start the car.
       2) Once running at idle, disconnect your battery.

Understanding the basic principles above, two things will happen.  If the alternator is bad, the car will shut off since there is no longer electricity being generated for the car to operate.  If the alternator is good, the car will stay running and your issue may be elsewhere.  If the car won't start at all, even with a jump on the battery, then you might check the battery.

- Bryan Lin | CEO, The Motorsports Authority, Inc. | www.MSAStore.com

Monday, December 3, 2012

Your Car 101 (Series) - How do I know my brakes need to be changed?

How do I know my brakes need to be replaced?
Bad Brakes?  DIY on checking your brakes.
There are two ways you can go about this.  The easiest is to look at your brake reservoir (assuming all other part are working correctly).  Let me explain...

Option 1

Do you remember your first bicycle with the hand brakes?  It had two little pads that pressed against the front or rear wheel.  Your car really isn't that much different.  Each rotor has two pads with it, and the rotor is fixed to your axle.  So when your wheels are turning, so is your rotor.  When you want to stop, the two pads press against each side of the rotor, bringing your vehicle to a stop.  The difference between your car and that bicycle is the car uses brake fluid whereas a bicycle uses a cable.  When you pulled the cable, the two pads would press against the wheel.  When you push your car's brake pedal, you're pushing fluid out of the reservoir, through the brake lines, and telling the brake pads to push against the rotors.  Make sense?  Ok...here's the key factor.

Each time you apply the brakes, you lose a certain amount of brake pad.  Depending on how you drive, it'll be more or less.  However, when you release the brake pedal, the pads only move back from the rotors a certain amount every time.  This is good, because the pads don't have a large distance to travel to slow your vehicle down.  However you have less pad now and less goes back in the reservoir.  Therefore, as the brake pads wear down, so does the fluid level in the brake reservoir.  

Now for the "watch out for"s.  First, remember where the fluid is to begin with.  If you don't, you can't tell if your fluid level is dropping.  Your brake master cylinder is the big part on the back wall which the brake reservoir is attached to.  That could possibly be going bad as well.

Option 2

This is the fun part.  Option two is jacking up your vehicle and removing the wheel and tire.  Once removed, you can look into the brake caliper to view the brake pads.  You can tell with your eyes whether your pads need replacing. 

Option 3

If you have access to a lift, you can put the car in the air without removing the wheels.  Sometimes (especially if you have larger wheels), you can still see the pads.

Recommendations

Do NOT wait too long.  If you hear a grinding noise or feel through the brake pedal that there is metal on metal contact, it might be too late.  See...when the pads get down to the point where the metal in the middle is exposed, the pads then start grinding into the rotors and putting grooves in it.  This is very bad for new pads and will accelerate the wear of any new pads.  Also, with it not being a flat surface, the pads will only come in contact with part of the rotor and that can affect braking distance and capabilities.  The results?  New rotors, which typically starts around $50 each corner.  Changing them on a regular schedule and keeping an eye on the pad's wear will save you some money in the long run.

- Bryan Lin | CEO, The Motorsports Authority, Inc. | www.MSAStore.com